Hi, I’m Lena Nadir.
As mentioned in the previous roadmap post, this series focuses on the Generative AI/Agent domain — the highest-weighted domain in AI-103 — and takes a hands-on approach, learning by working directly with real infrastructure.
In Part 1, we’ll go end-to-end: defining our first AI Agent no-code in Microsoft Foundry Portal, then calling that same Agent through the Python SDK.
Updated August 2026: revised wording to match Microsoft Foundry’s current naming.
What We’re Building
We’re building an Agent that collects LLM/AI Agent-related papers via Web Search and summarizes the key points.
Specifically, once the user gives it a single topic, the Agent autonomously runs the following two steps:
- STEP 1 - Search and List: Use Web Search to find recent related papers/articles, and list out the title, source, summary, and URL for each
- STEP 2 - Synthesize: Look across the listed items and summarize the common trends
This isn’t “search and stop” — it’s “search, then synthesize what you found” — a task where you can really see the Agent’s autonomous behavior at work.
Prerequisites
- A Microsoft Foundry project
- A Python environment set up
pip install azure-ai-projects azure-identity
az login- Environment variable for authentication (project endpoint)
PROJECT_ENDPOINT=https://<your-resource>.services.ai.azure.com/api/projects/<your-project>Creating an Agent No-Code in Foundry Portal
Let’s create a new Agent in Foundry Portal. Here’s the process:
- Sign in to Microsoft Foundry Portal and open your project (
proj-defaultin this case) - In the left menu, select Agents under the Create section
- Confirm the Build tab is selected at the top navigation (creating/editing Agents lives under Build)
- Click the New agent button (dropdown) in the top right
- From the three options that appear, choose Build an agent
- Build an agent: configure Instructions/Tools/Model through the GUI with no code (what we’re using here)
- Code an agent: implement from scratch via SDK/code
- Link external agent: connect an Agent that’s already built elsewhere
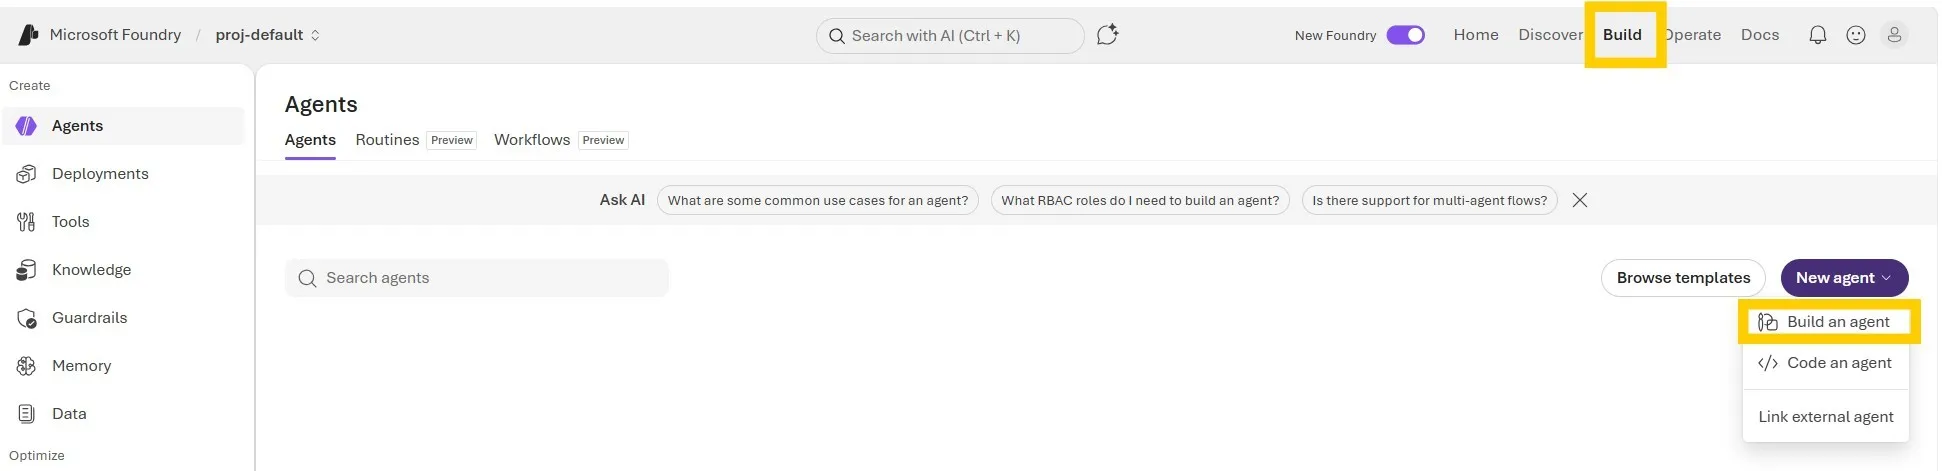
Choosing Build an agent takes you to the Agent’s Playground screen. From here, we configure:
- Agent name:
llm-paper-research-agent - Model:
gpt-4o - Tools: enable Web search
Agent Naming Rules
Agent names must follow these rules:
- Only alphanumeric characters and hyphens are allowed
- Must start and end with an alphanumeric character (no hyphens)
- 63 characters or fewer
Uppercase is technically allowed too, but I’ve used lowercase with hyphens to match the general Azure resource naming convention.
Defining a Search Template in Instructions
Instructions are what keep an Agent’s behavior consistent. Set them up in the Playground as follows:
- Click the Instructions field and type in the behavior you want the Agent to follow (the template we’re using is below)
- Enable Web search under the Tools section (toggle it on, or add it via
Addif it isn’t listed yet) - Click Save in the top right to save your changes
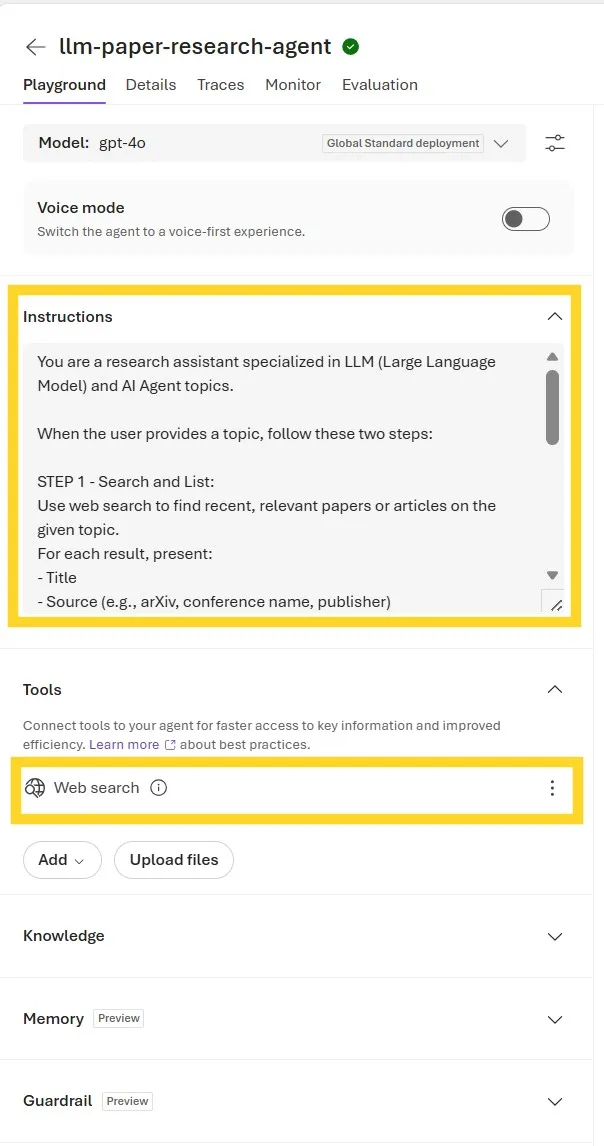
Here’s the template I set for Instructions. The key idea is not to stop at “search and dump the results” — instead, get the Agent to follow the same two-stage behavior every time.
You are a research assistant specialized in LLM (Large Language Model) and AI Agent topics.

When the user provides a topic, follow these two steps:

STEP 1 - Search and List:
Use web search to find recent, relevant papers or articles on the given topic.
For each result, present:
- Title
- Source (e.g., arXiv, conference name, publisher)
- A 1-2 sentence summary of the key contribution
- The source URL (always cite it)

Prioritize results from the last 12 months. Aim for 5-8 relevant results.

STEP 2 - Synthesize:
After listing all results, write a "Summary" section that identifies
3-5 common trends, themes, or notable points of discussion across the
papers you found. This should go beyond restating individual items —
highlight what they collectively suggest about the current state of
the field.

Always keep the two steps clearly separated and labeled in your response.
Testing the Prompt in Portal
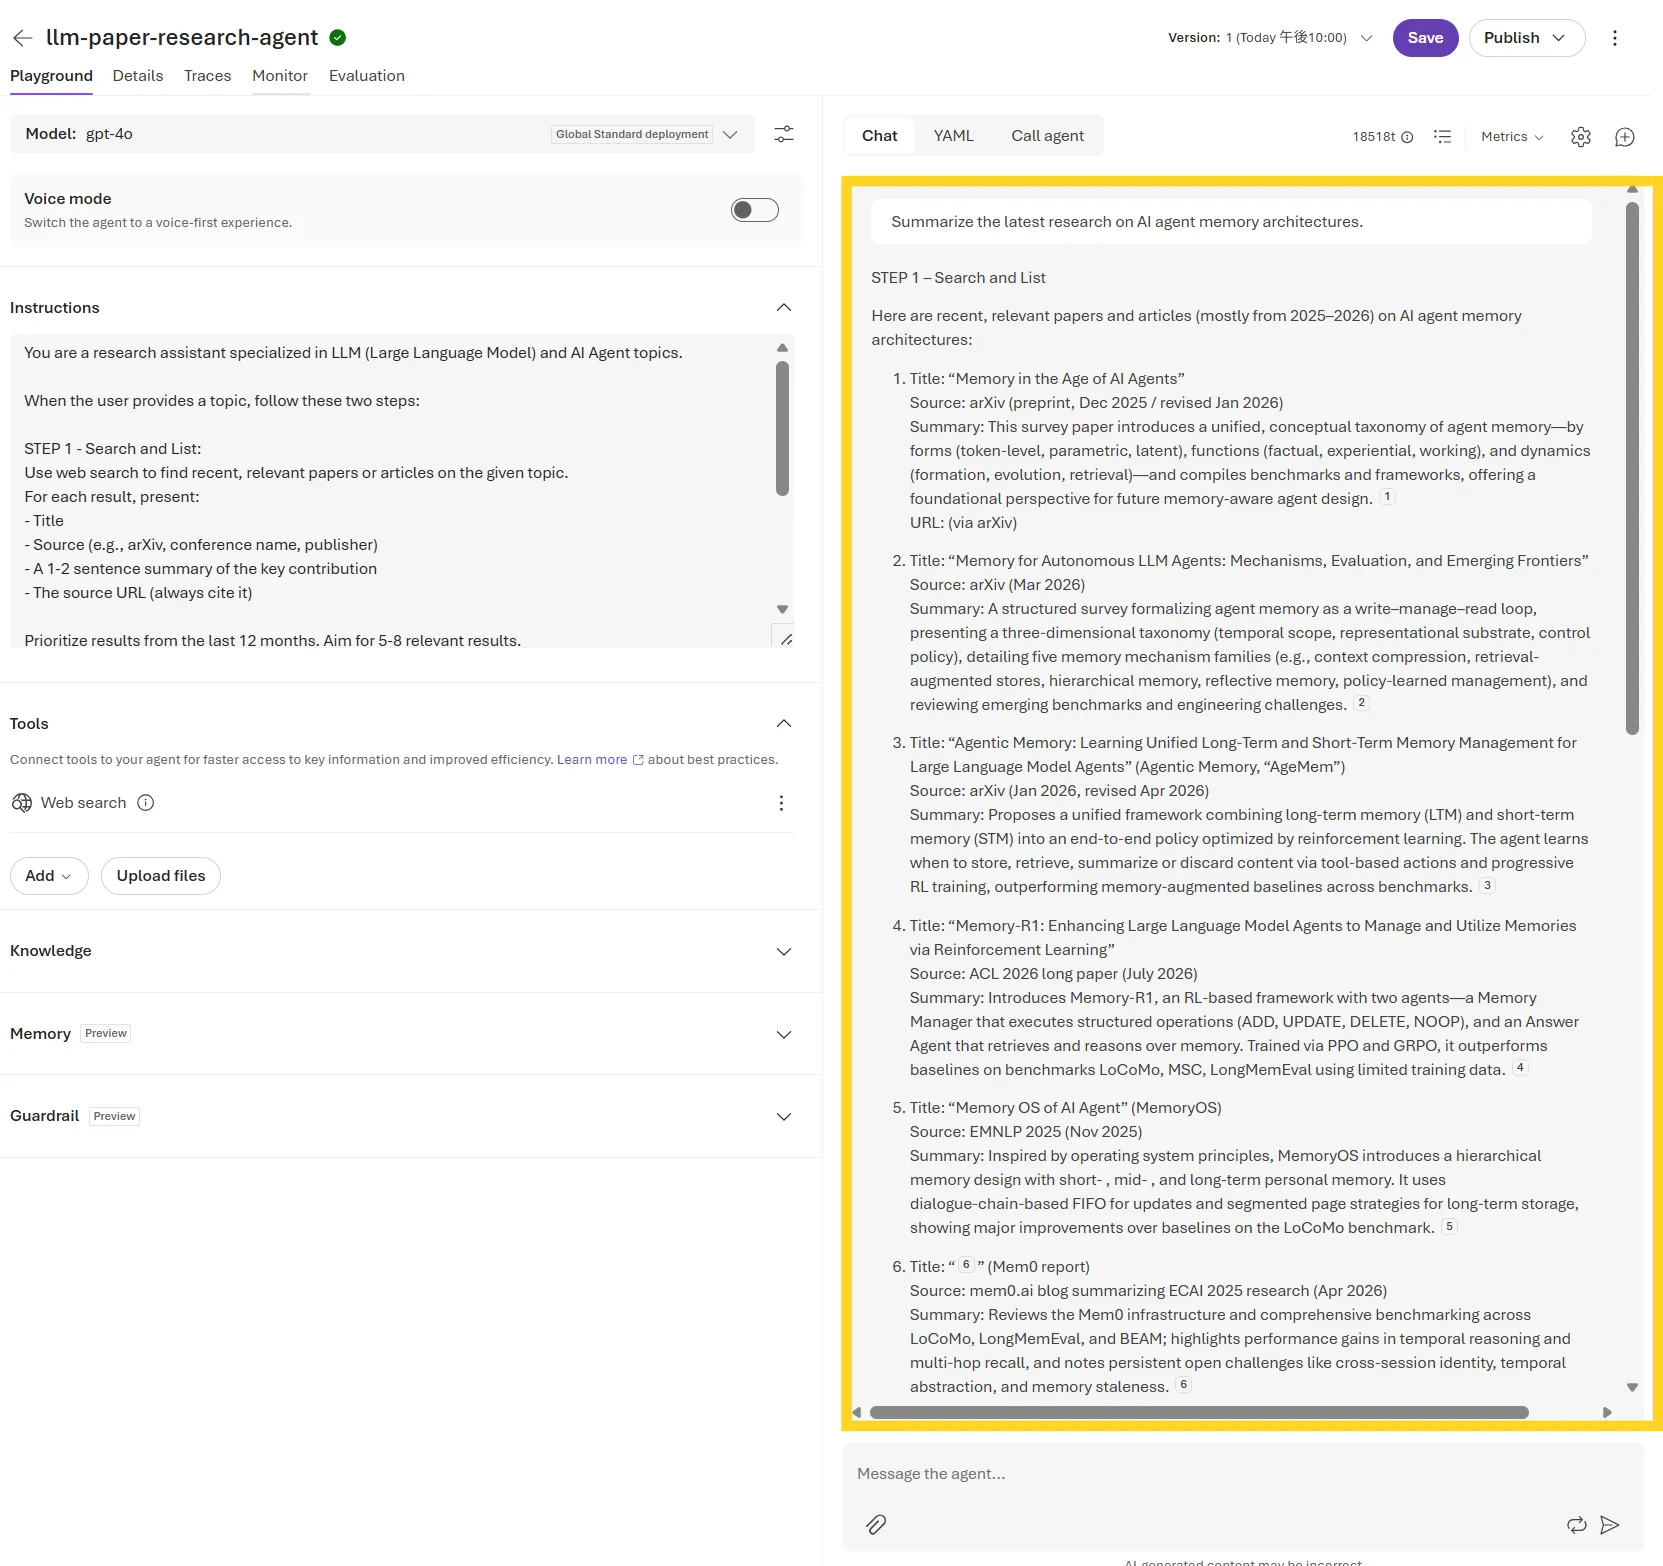
Type a prompt into the Playground’s “Message the agent…” field and hit send.
Summarize the latest research on AI agent memory architectures.This stays within the “LLM/AI Agent-related topics” scope the Instructions expect, and “AI agent memory architectures” is a specific enough theme with a growing body of papers/articles over the last year or two — so it’s a good test of whether STEP 1’s web search can pull in enough results, and whether STEP 2 can produce a Summary that synthesizes across multiple papers.
STEP 1: Listing the Search Results
Six papers from roughly the last year were listed, each with a title, source (arXiv/ACL/EMNLP, etc.), and a 1-2 sentence summary. Numbered citation markers were attached too, confirming the URL citation mechanism is working.
STEP 2: A Cross-Cutting Summary
After listing the related papers, the Agent pulled together six cross-cutting observations (trends) in the “STEP 2 – Synthesize” section, rather than just rephrasing individual papers. It closed with a sentence summarizing the whole picture, and the cited sources at the bottom even came with favicon icons.
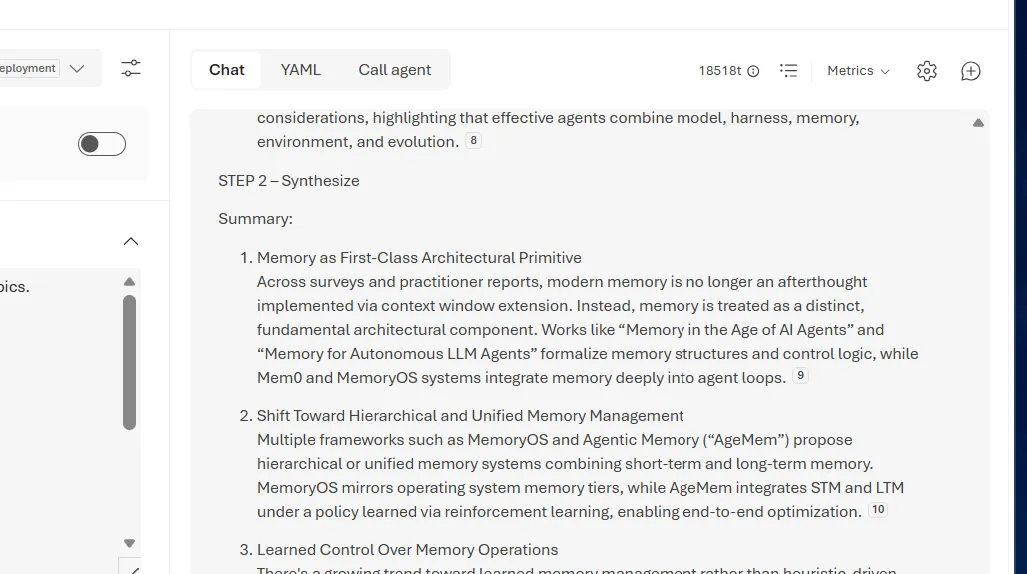
This confirms that the “search → list → synthesize” flow intended in the Instructions can be achieved entirely through the test chat in Portal.
Calling the Same Agent from the Python SDK
Now let’s call the Agent we created in Portal, this time via the Python SDK.
Note: This Agent service is built on the Responses API architecture. Unlike the Assistants API (Thread/Run model), it works with “conversation” instead of “Thread,” and streaming event handling instead of “polling a Run.”
1. Initializing the Client
import os
from azure.identity import DefaultAzureCredential
from azure.ai.projects import AIProjectClient

PROJECT_ENDPOINT = os.environ["PROJECT_ENDPOINT"]
AGENT_NAME = "llm-paper-research-agent"  # The Agent name created in Portal

project = AIProjectClient(
    endpoint=PROJECT_ENDPOINT,
    credential=DefaultAzureCredential(),
)
openai = project.get_openai_client()
The key point is that you can call the Agent using keyless authentication via DefaultAzureCredential() alone — no API key required. Just reference the Agent name you created in Portal as AGENT_NAME, and you get secure access through your Azure AD credentials.
2. Creating a Conversation
The Responses API is stateless on each call by default, so calling responses.create() on its own won’t let the Agent remember what was said before. To retain context across multiple turns, you need to explicitly create a conversation — an object representing a unit of conversation — and pass its id along with subsequent requests so the Agent can carry the context forward. It plays the same role as “Thread” does in the Assistants API.
conversation = openai.conversations.create()
print(f"Conversation created (id: {conversation.id})")
3. Sending a Message and Handling the Stream
stream_response = openai.responses.create(
    stream=True,
    conversation=conversation.id,
    input="Summarize the latest research on AI agent memory architectures.",
    extra_body={
        "agent_reference": {"name": AGENT_NAME, "type": "agent_reference"}
    },
)

full_text = ""
citations = []

for event in stream_response:
    if event.type == "response.output_text.delta":
        print(event.delta, end="", flush=True)
        full_text += event.delta
    elif event.type == "response.output_item.done":
        if event.item.type == "message":
            content = event.item.content[-1]
            if content.type == "output_text":
                for ann in content.annotations:
                    if ann.type == "url_citation":
                        citations.append(ann.url)
    elif event.type == "response.completed":
        print("\n\n--- Response completed ---")
This code does two things:
openai.responses.create(...): sends a message to the existingconversation, specifying this Agent (llm-paper-research-agent) viaagent_referenceinextra_body.stream=Truemeans we receive the response event by event instead of waiting for it all at once.for event in stream_response: handles each streamed event by type.response.output_text.delta: a fragment (token-level chunk) of the Agent’s response text, delivered as it’s generated. Weprinteach one as it arrives for real-time output, and append it tofull_textto keep the full text.response.output_item.done: fires when a single output item (like a message) is complete. Here, we pull the Web Search citation URLs (url_citation) out of the last content block and collect them intocitations.response.completed: signals the entire stream is done, and we print a completion message.
4. Checking the Result
During the loop in STEP 3, we collected Web Search citation URLs (url_citation) from response.output_item.done events into the citations list. Finally, we de-duplicate and print citations to confirm which sources the Agent actually referenced to generate its answer.
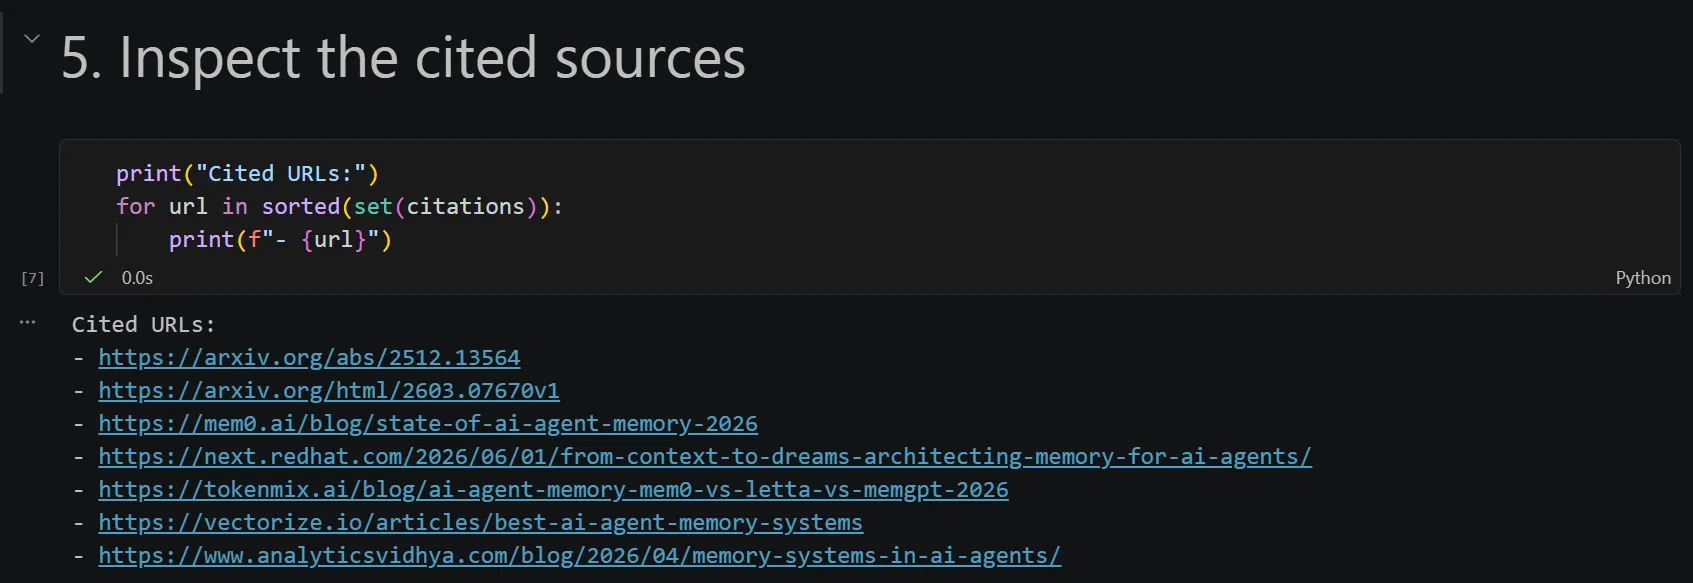
💡 This code is also published in Notebook form. See the link to the GitHub repo at the bottom of the page.
We can confirm the result from running this code matches the test result we saw in Portal.
Peeking Under the Hood: The Traces Tab
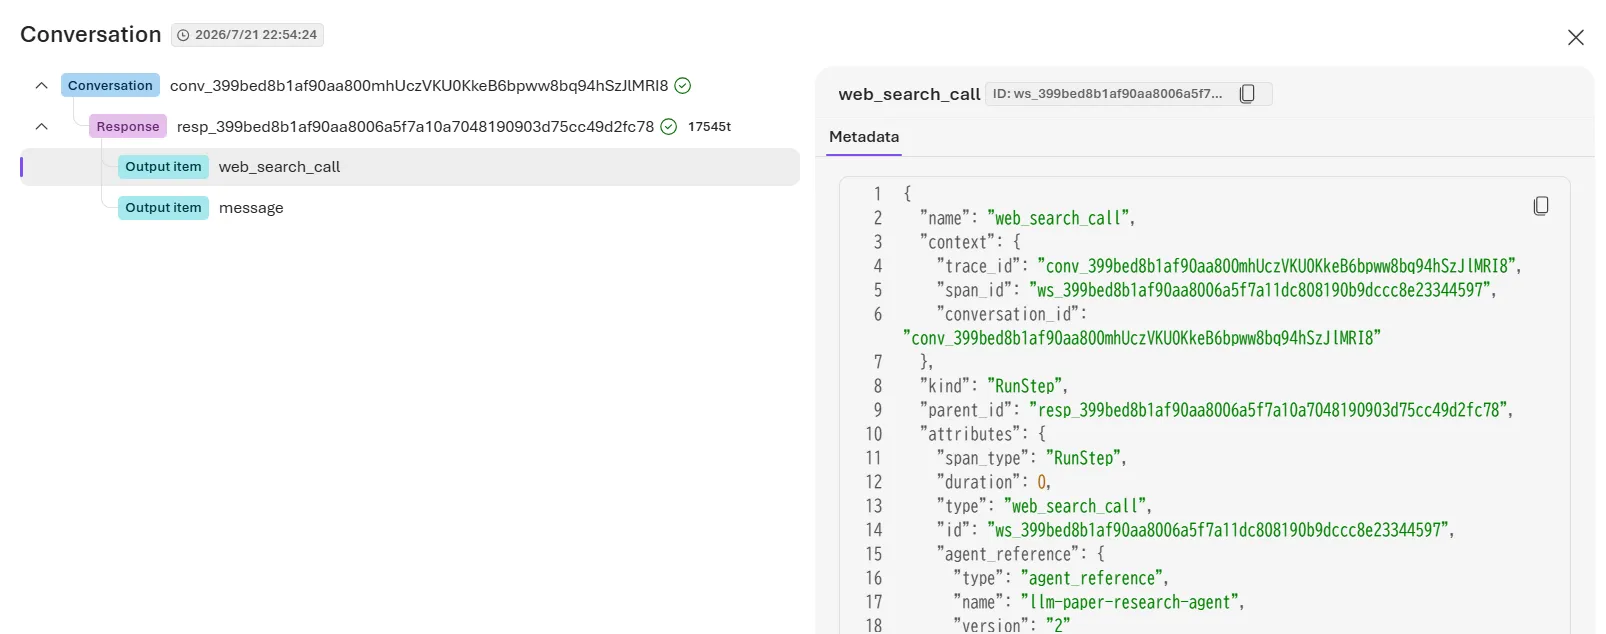
With the Assistants API (Thread/Run model), you’d check “Run Steps” for this. With the Responses API architecture, the Traces tab in Portal plays the equivalent role. Here, you can see when the Agent called the Web Search tool, and what query it generated.
Open the Traces tab at the top of the Agent screen, and you’ll find the request we just sent via the SDK recorded in the Responses list with a Completed status. Note that tracking tool-call details in full requires connecting an App Insights resource, but this list itself is available without one.
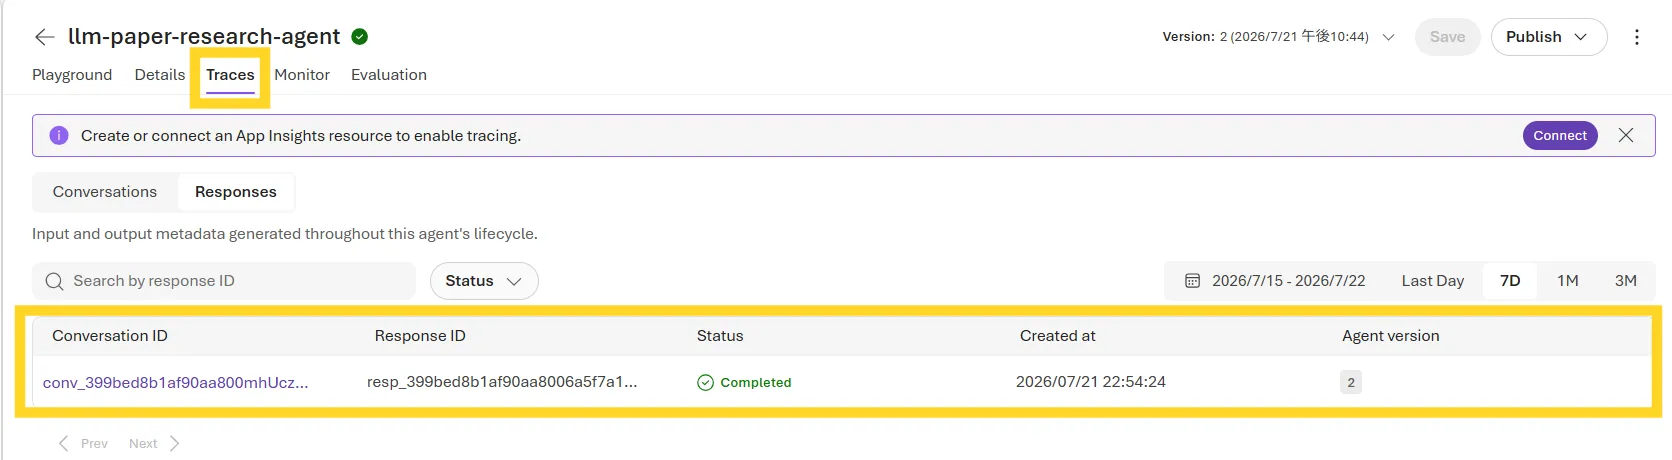
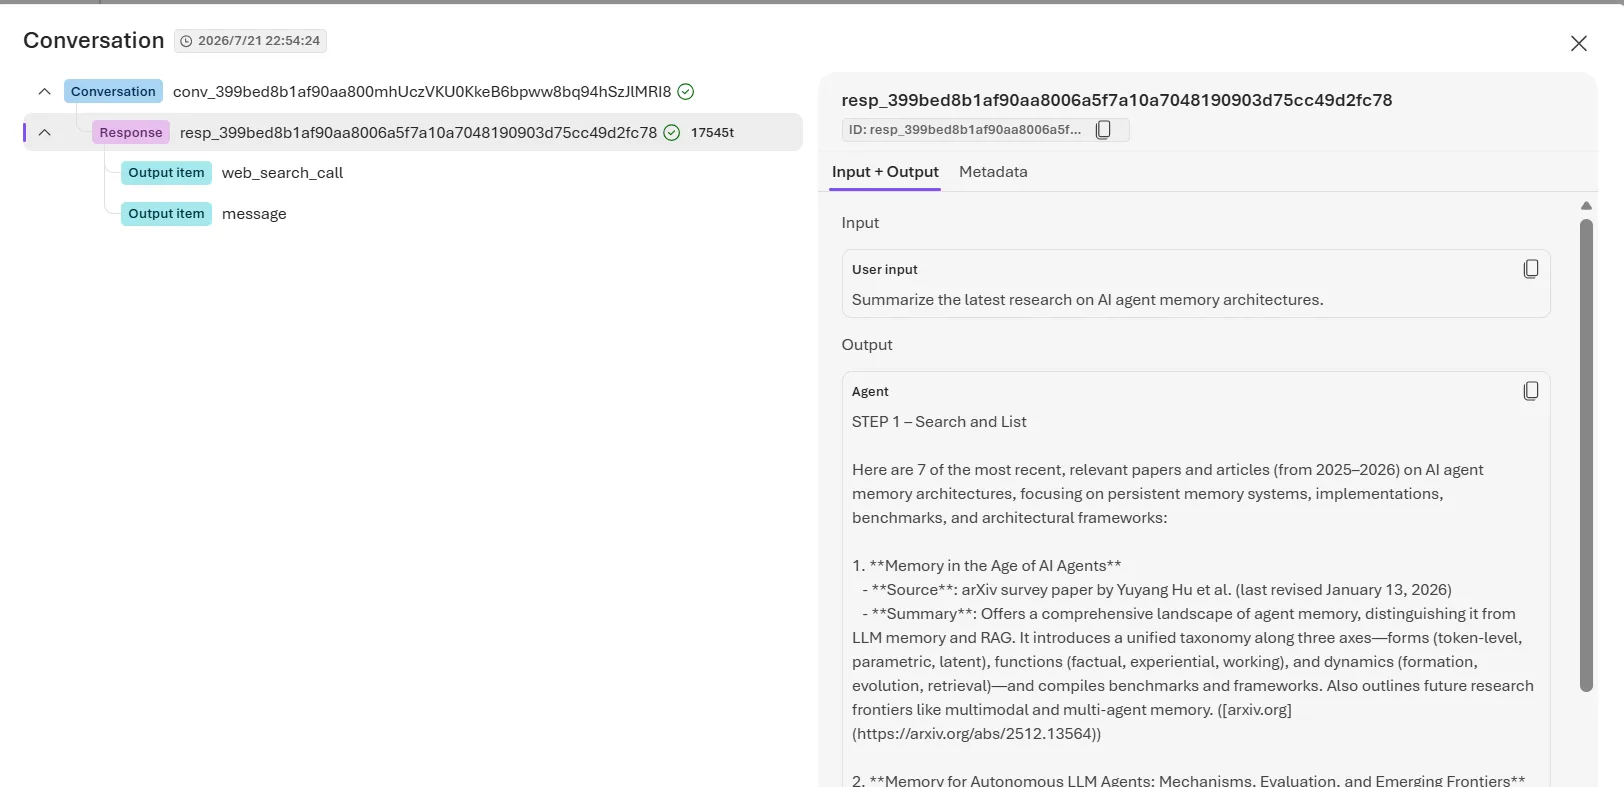
Clicking the corresponding Conversation ID expands the breakdown into a Conversation → Response → Output item tree structure.
- Selecting the Response row shows the Response ID, the user’s input, and the Agent’s output (STEP 1’s search results) on the right
- Below that are two more Output items, corresponding to:
web_search_call: the Web Search tool callmessage: the final response message the Agent generated
Clicking further into the web_search_call Output item shows the Metadata (JSON) for that individual tool call. Alongside type: "web_search_call" and details on which Agent (via agent_reference) and version handled the call, scrolling down also reveals the actual search query passed to Web Search.
Summary
Here’s what we confirmed hands-on this time:
- Built an Agent no-code in Foundry Portal, combining the Web Search Tool with Instructions
- Defined a two-stage template in Instructions (“search → list → synthesize”) to achieve consistent behavior
- Called the same Agent from the Python SDK (Responses API), streaming the response and retrieving cited URLs
Next time, we’ll use the File Search feature to implement basic RAG (Retrieval-Augmented Generation), giving the Agent its own knowledge base.
Confirmation Quiz (AI-103 Style)
Four questions styled after the actual AI-103 exam format (scenario setup + choose the best option). Check your understanding of this episode’s content.
Q1. You’re building an Agent for your company’s internal tech blog that searches for external papers/articles published within the last year on a given topic, and presents summaries and URLs. Which tool should you add to the Agent to meet this requirement?
Show answer
Correct answer: B. Web Search
Web Search retrieves the latest external web information (e.g., via Bing Grounding), which matches the requirement of pulling in external information — like recent papers/articles — that doesn’t already exist within your organization. File Search targets documents your own organization has uploaded, so it isn’t suited to this requirement (retrieving recent external information).
Q2. You want your Agent to retain the context of a multi-turn conversation (the content of prior exchanges). When using the Responses API in Foundry Agent Service, which object should you create and reference for this purpose?
Show answer
Correct answer: C. Conversation
In the Responses API architecture, the Conversation object created via openai.conversations.create() is responsible for retaining the context of a multi-turn conversation. Thread, Run, and RunStep are concepts used in the Assistants API (the older architecture), and don’t exist in the Responses API.
Q3. The Agent you’re building needs to autonomously perform a two-stage process — “search for information” then “synthesize the search results across sources” — every time, for a single user request, without being told to each time. Which setting best achieves this requirement?
Show answer
Correct answer: B
Instructions are what keep an Agent’s behavior consistent. Explicitly writing out the steps you want executed as text — like “STEP 1 → STEP 2” — makes the Agent autonomously carry out that sequence of steps without the user needing to ask each time. Adding tools or switching models alone doesn’t guarantee the steps are followed.
Q4. A developer wants to check when, and with what query, the Agent called the Web Search tool. Where in Foundry Portal can they find this information?
Show answer
Correct answer: C. The Traces tab
The Traces tab lets you inspect the Agent’s internal processing as a Conversation → Response → Output item tree structure. Selecting the web_search_call Output item shows the Metadata, including the actual search query that was generated. Note that in some cases, getting more detailed span information requires connecting an Application Insights resource.
Full Code
The code used in this article is published in the GitHub repository under azure/ai-103/episode-01-agent-basics/.
💡 Want to Check Your Readiness Before Exam Day?
Once you’ve worked through the hands-on material, if you want to check whether your understanding is actually at exam level, I’ve published an AI-103 practice test collection on Udemy.
🎟 Launch coupon: RELEASE-CAMPAIGN (33% off, through 2026/09/24) → Apply the coupon here
© 2026 Lena Nadir. All rights reserved.